
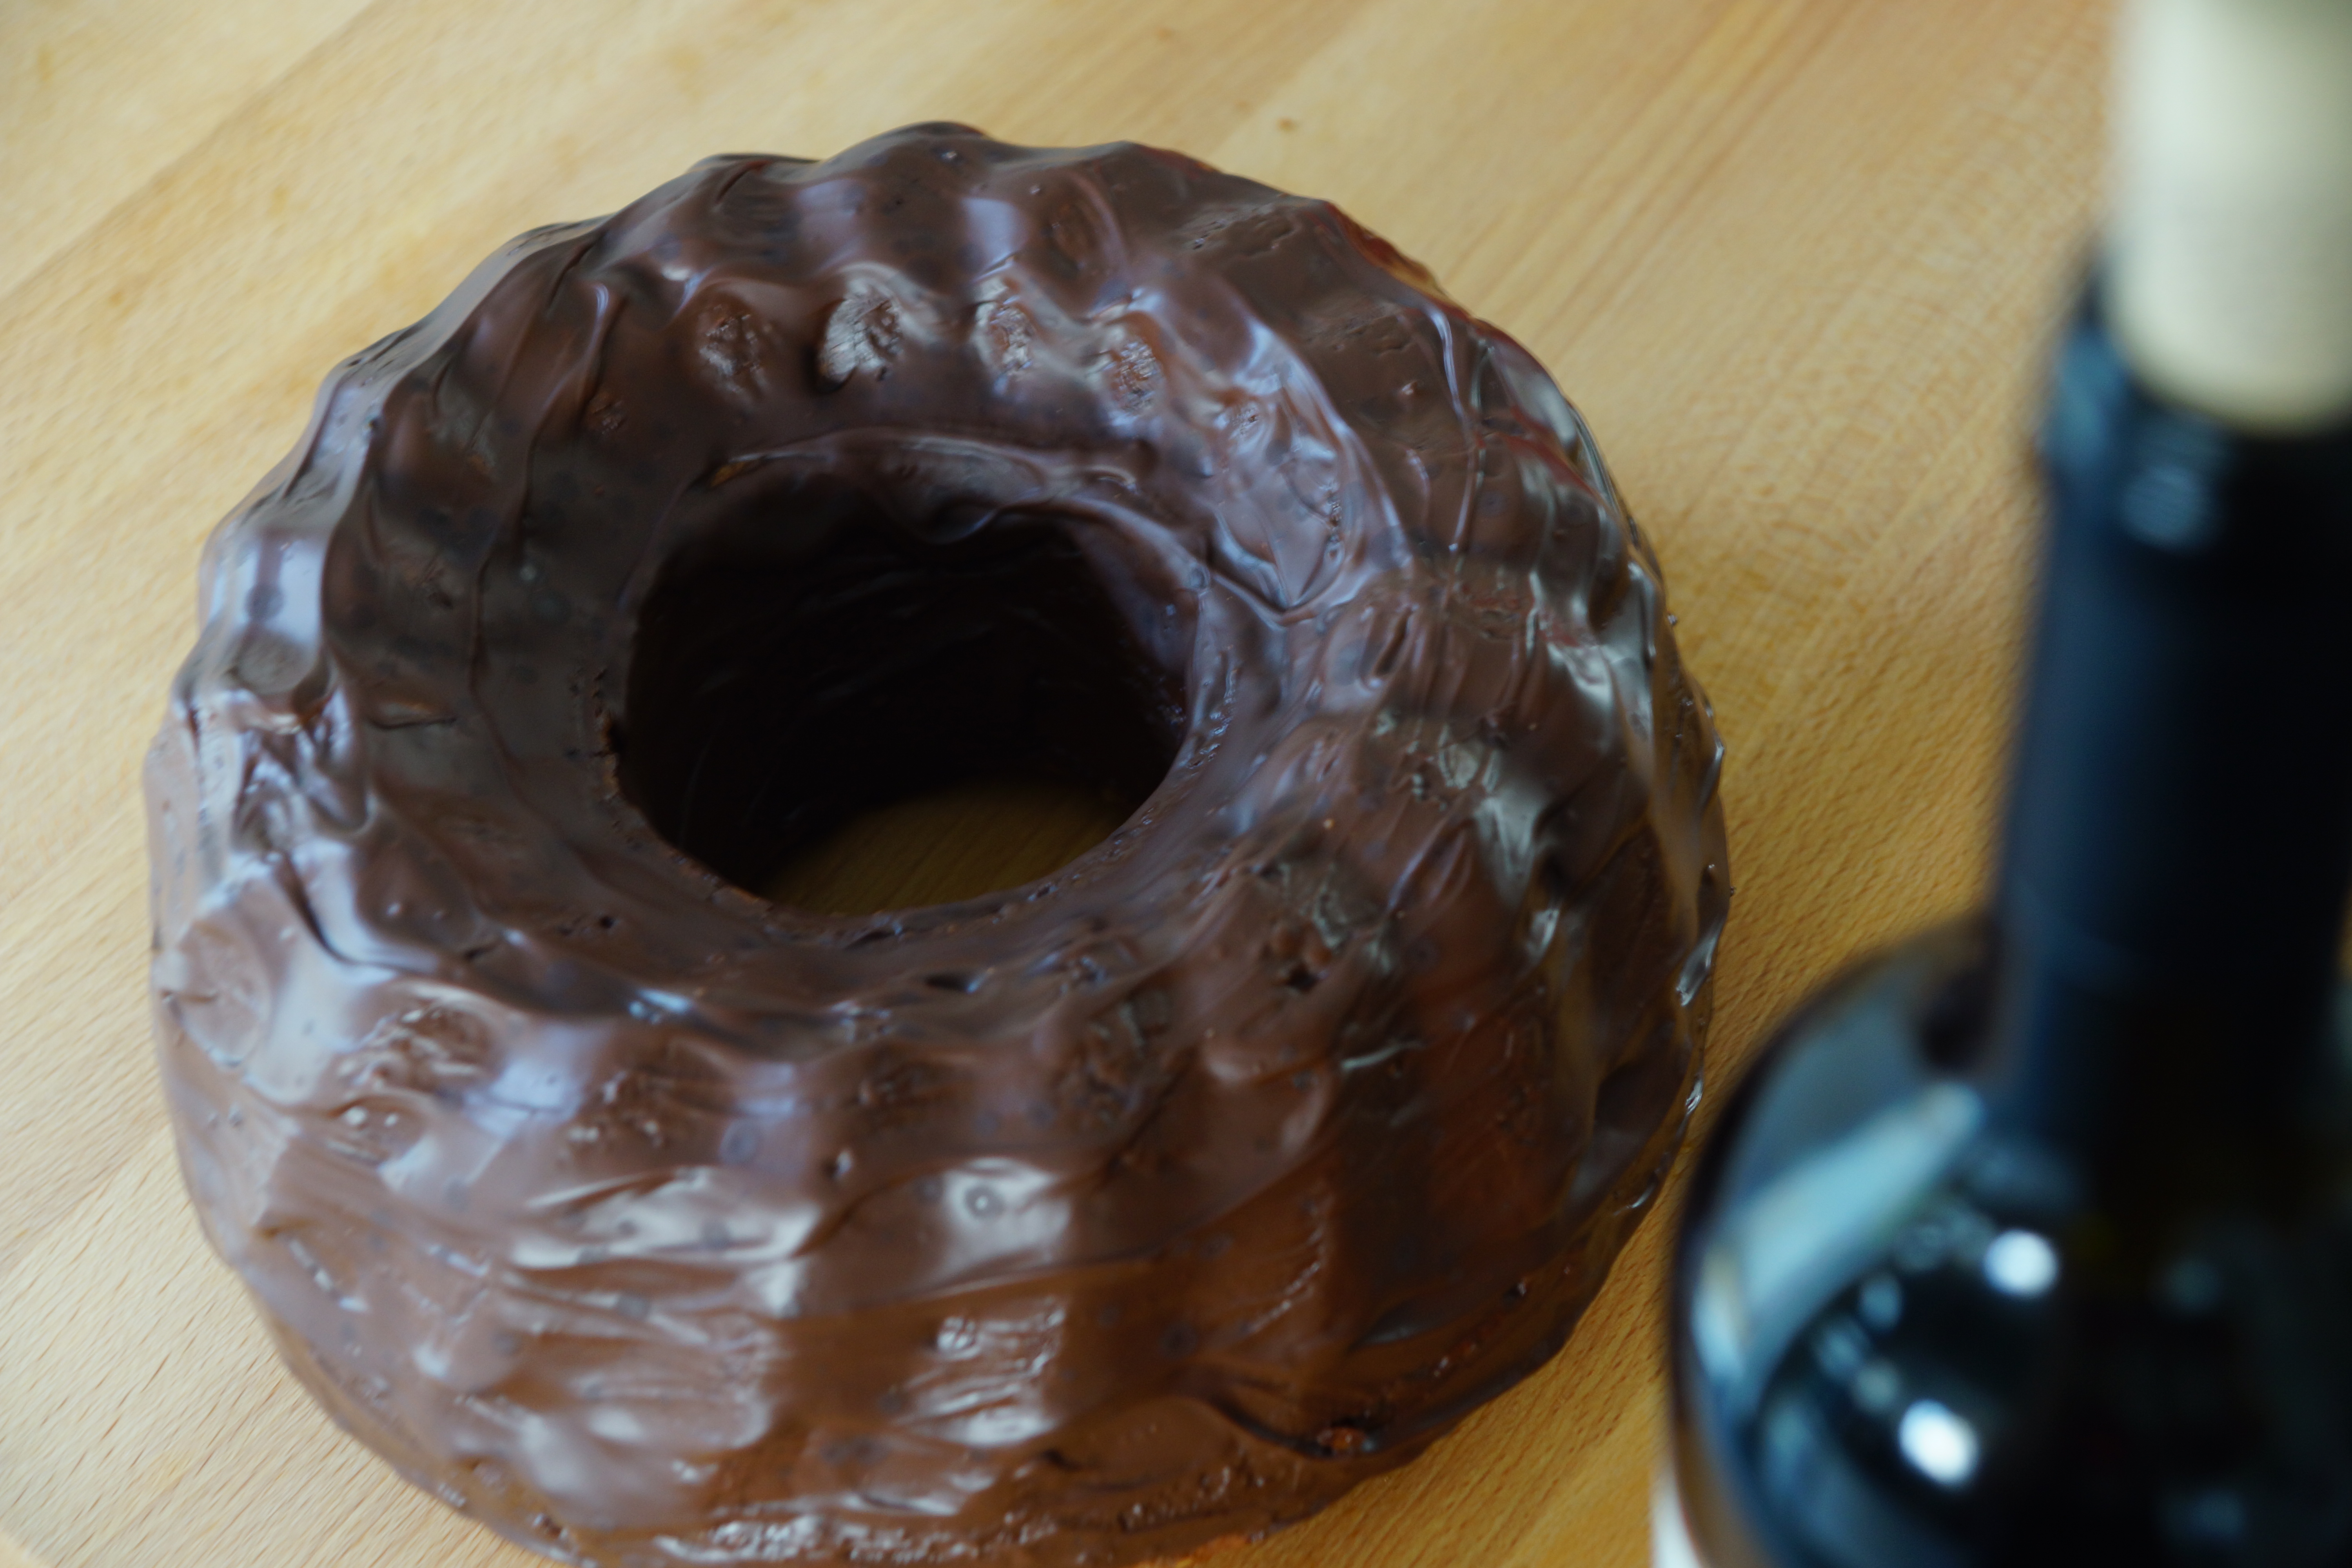
 I love boozy bakes! Don’t get me wrong I am no alcoholic, but even when I was a child the boozy cakes were the ones I loved the most. It was special when I was allowed to skim the foam of Dad’s beer glass or eat a piece of Black Forest Cherry Cake on a birthday, sometimes Mum even poured some advokaat over our shortly microwaved chocolate marshmallows for an extra treat. Whenever there was a bit of leftover red wine, my mother turned it into this delicious and moist cake. I now do this myself whenever we open a bottle we don’t like, so the taste of this cake varies with the wine you use, but it is always scrumtious and keeps fresh vor 3-4 days. My sister tweaked the recipe a little with more chocolate sprinkles (who could say no to more chocolate?!?) and I stole it from her so you can also start to save that wine from the drain! Continue reading
Category Archives: Recipes
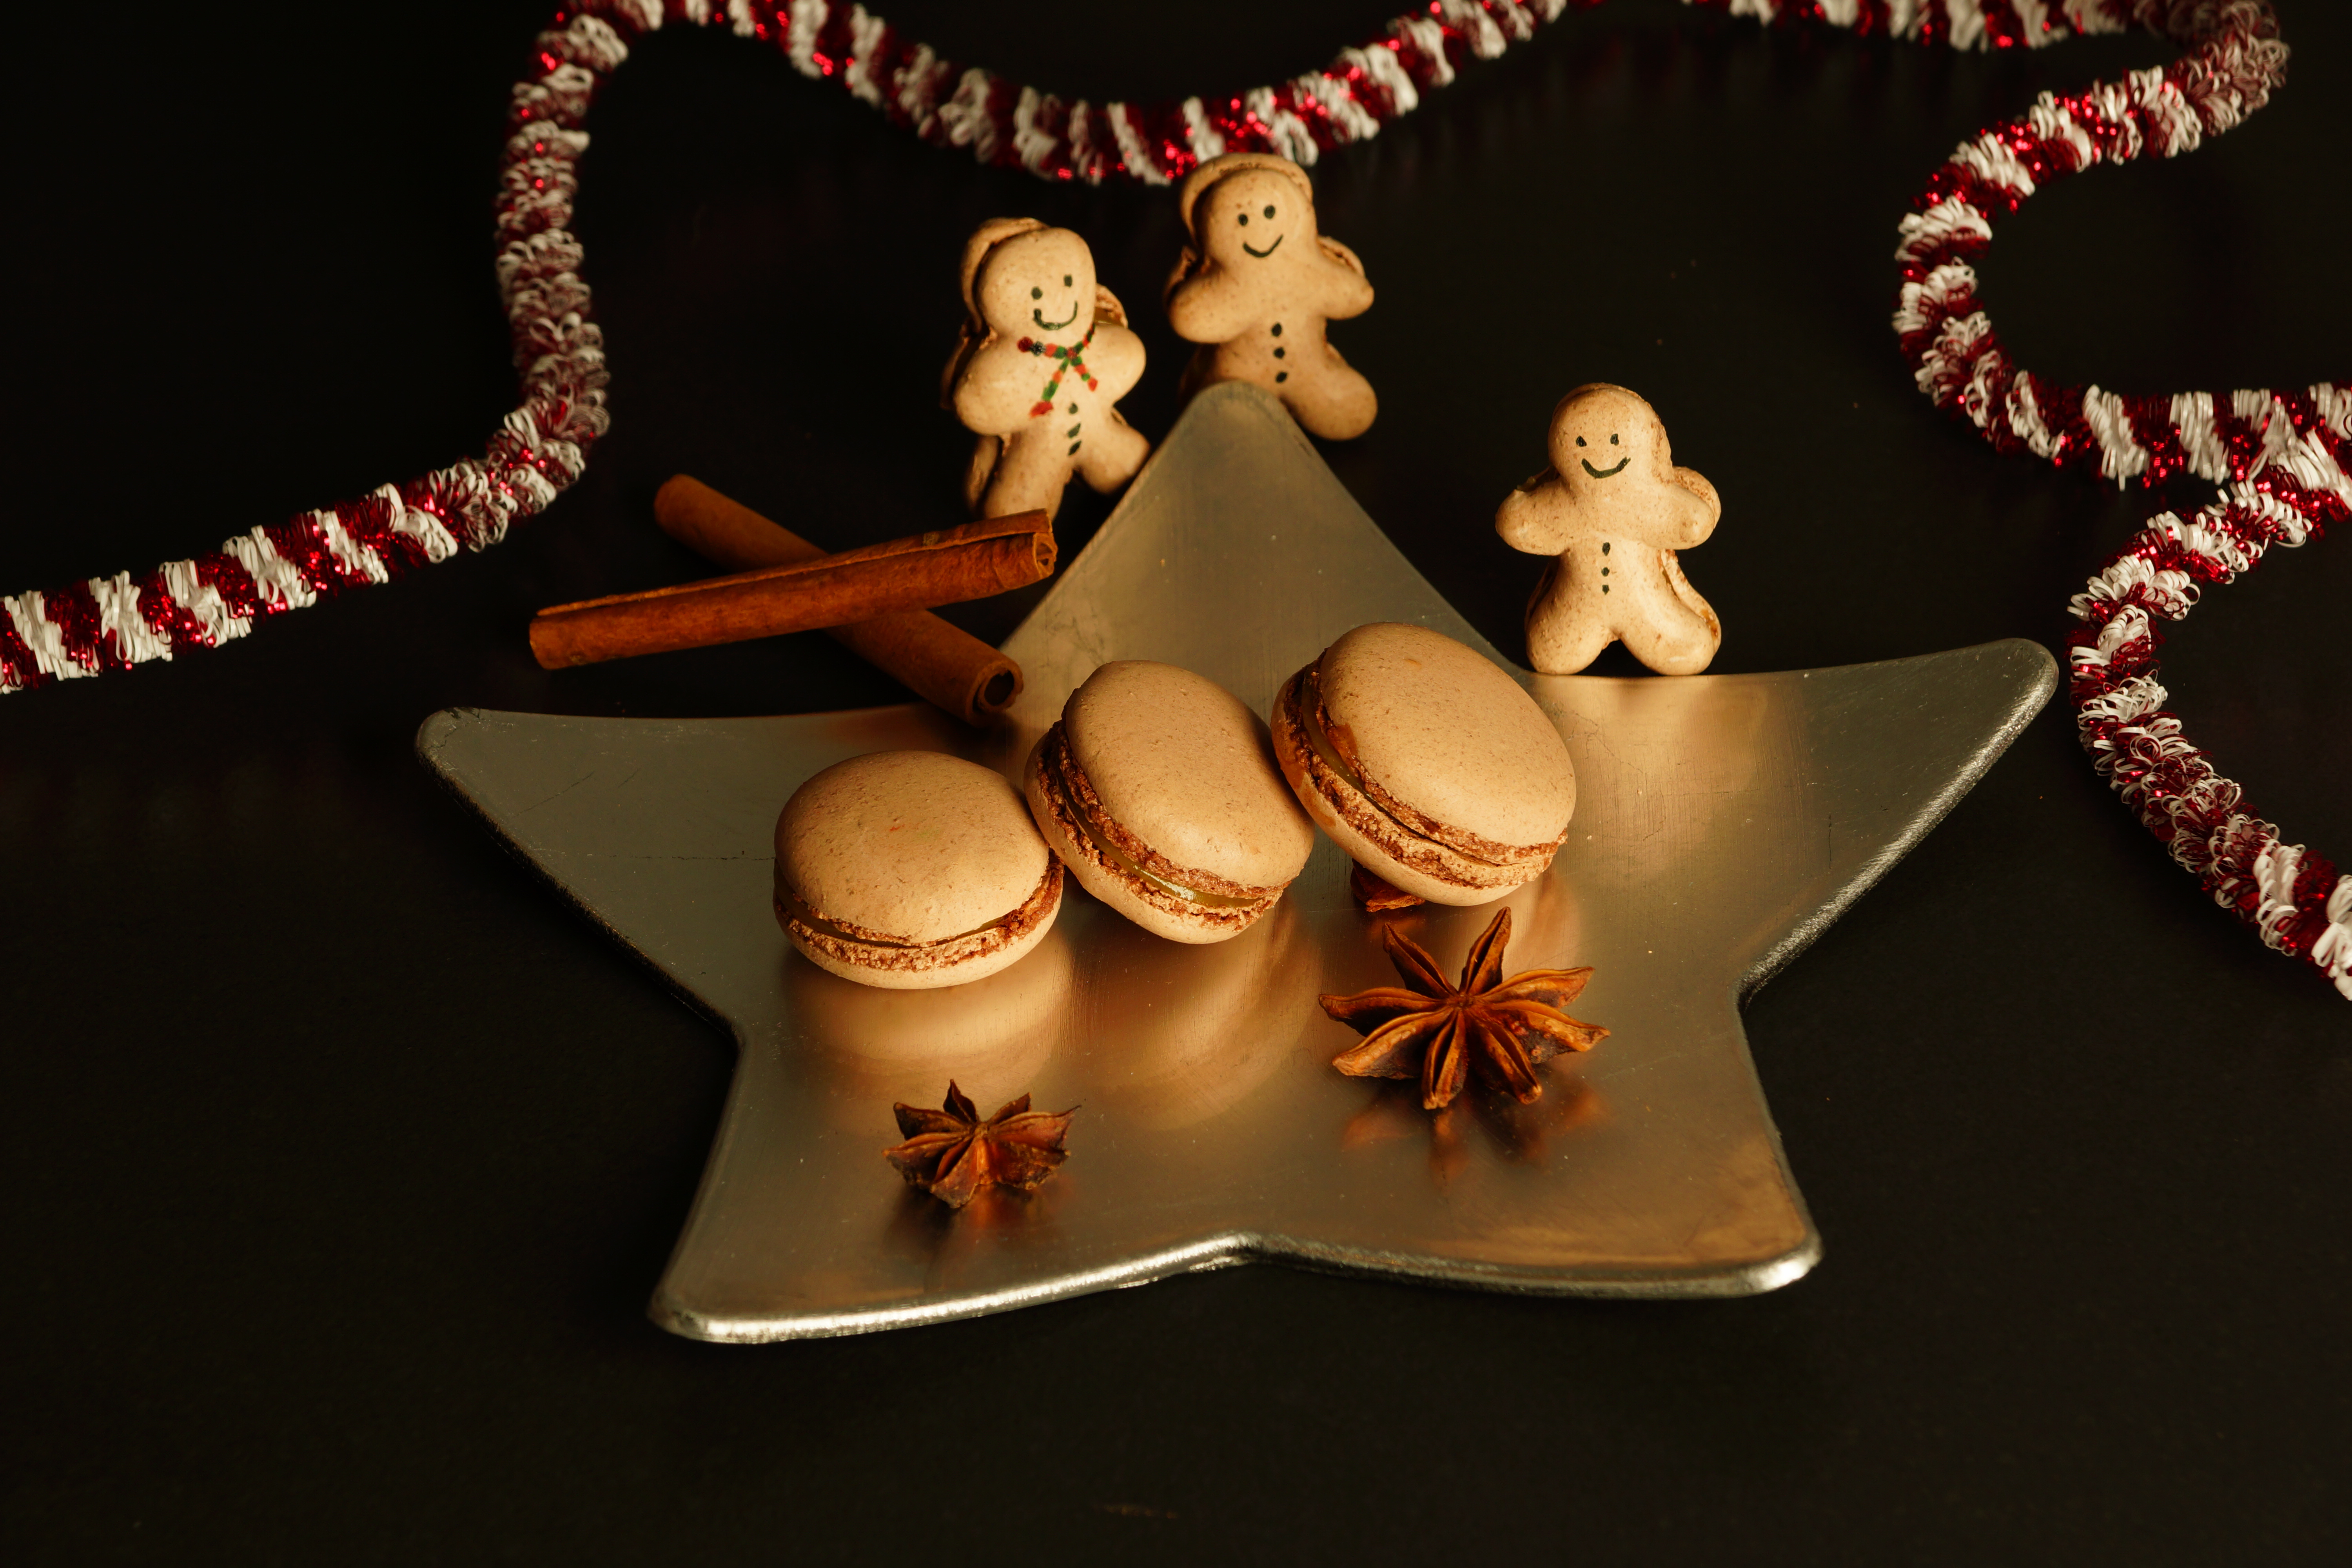
Gingerbread Macarons with Lemon Curd filling
 Can you believe it, Christmas is only 1 week away. Nothing says “I care about you” better that a homemade gift. It shows that you rather invest some of your precious time to delight your beloved ones than just ordering a gift online. There is nothing wrong with buying gifts, don’t get me wrong, but I love to give a little personal touch with something crafted or homemade and you should consider that too. So get into the kitchen or at your craft table and whip, glue or paint something for the ones that you love!
I know I promised my German readers to start blogging in German. I know some of you hav been waiting for this for a long time, but still I am trying to tackle some technical obstacles. But today is your lucky day as this Christmas Macaron recipe is part of the Advent calendar over at Kuchenbäcker blog. I am really excited about this and I hope you enjoy the read and of course the making of these wonderful Christmas treats. I put them in selfmade matchbox-like boxes or painted egg boxes, nicely decorated and with colourful ribbons. If you want to gift them for Christmas, here is a useful bit of information: They keep fresh in the fridge for up to 3 days or you can freeze them in ziplock bags. If you have never done Macarons before, you might want to look into my basic macaron recipe for some general tipps.
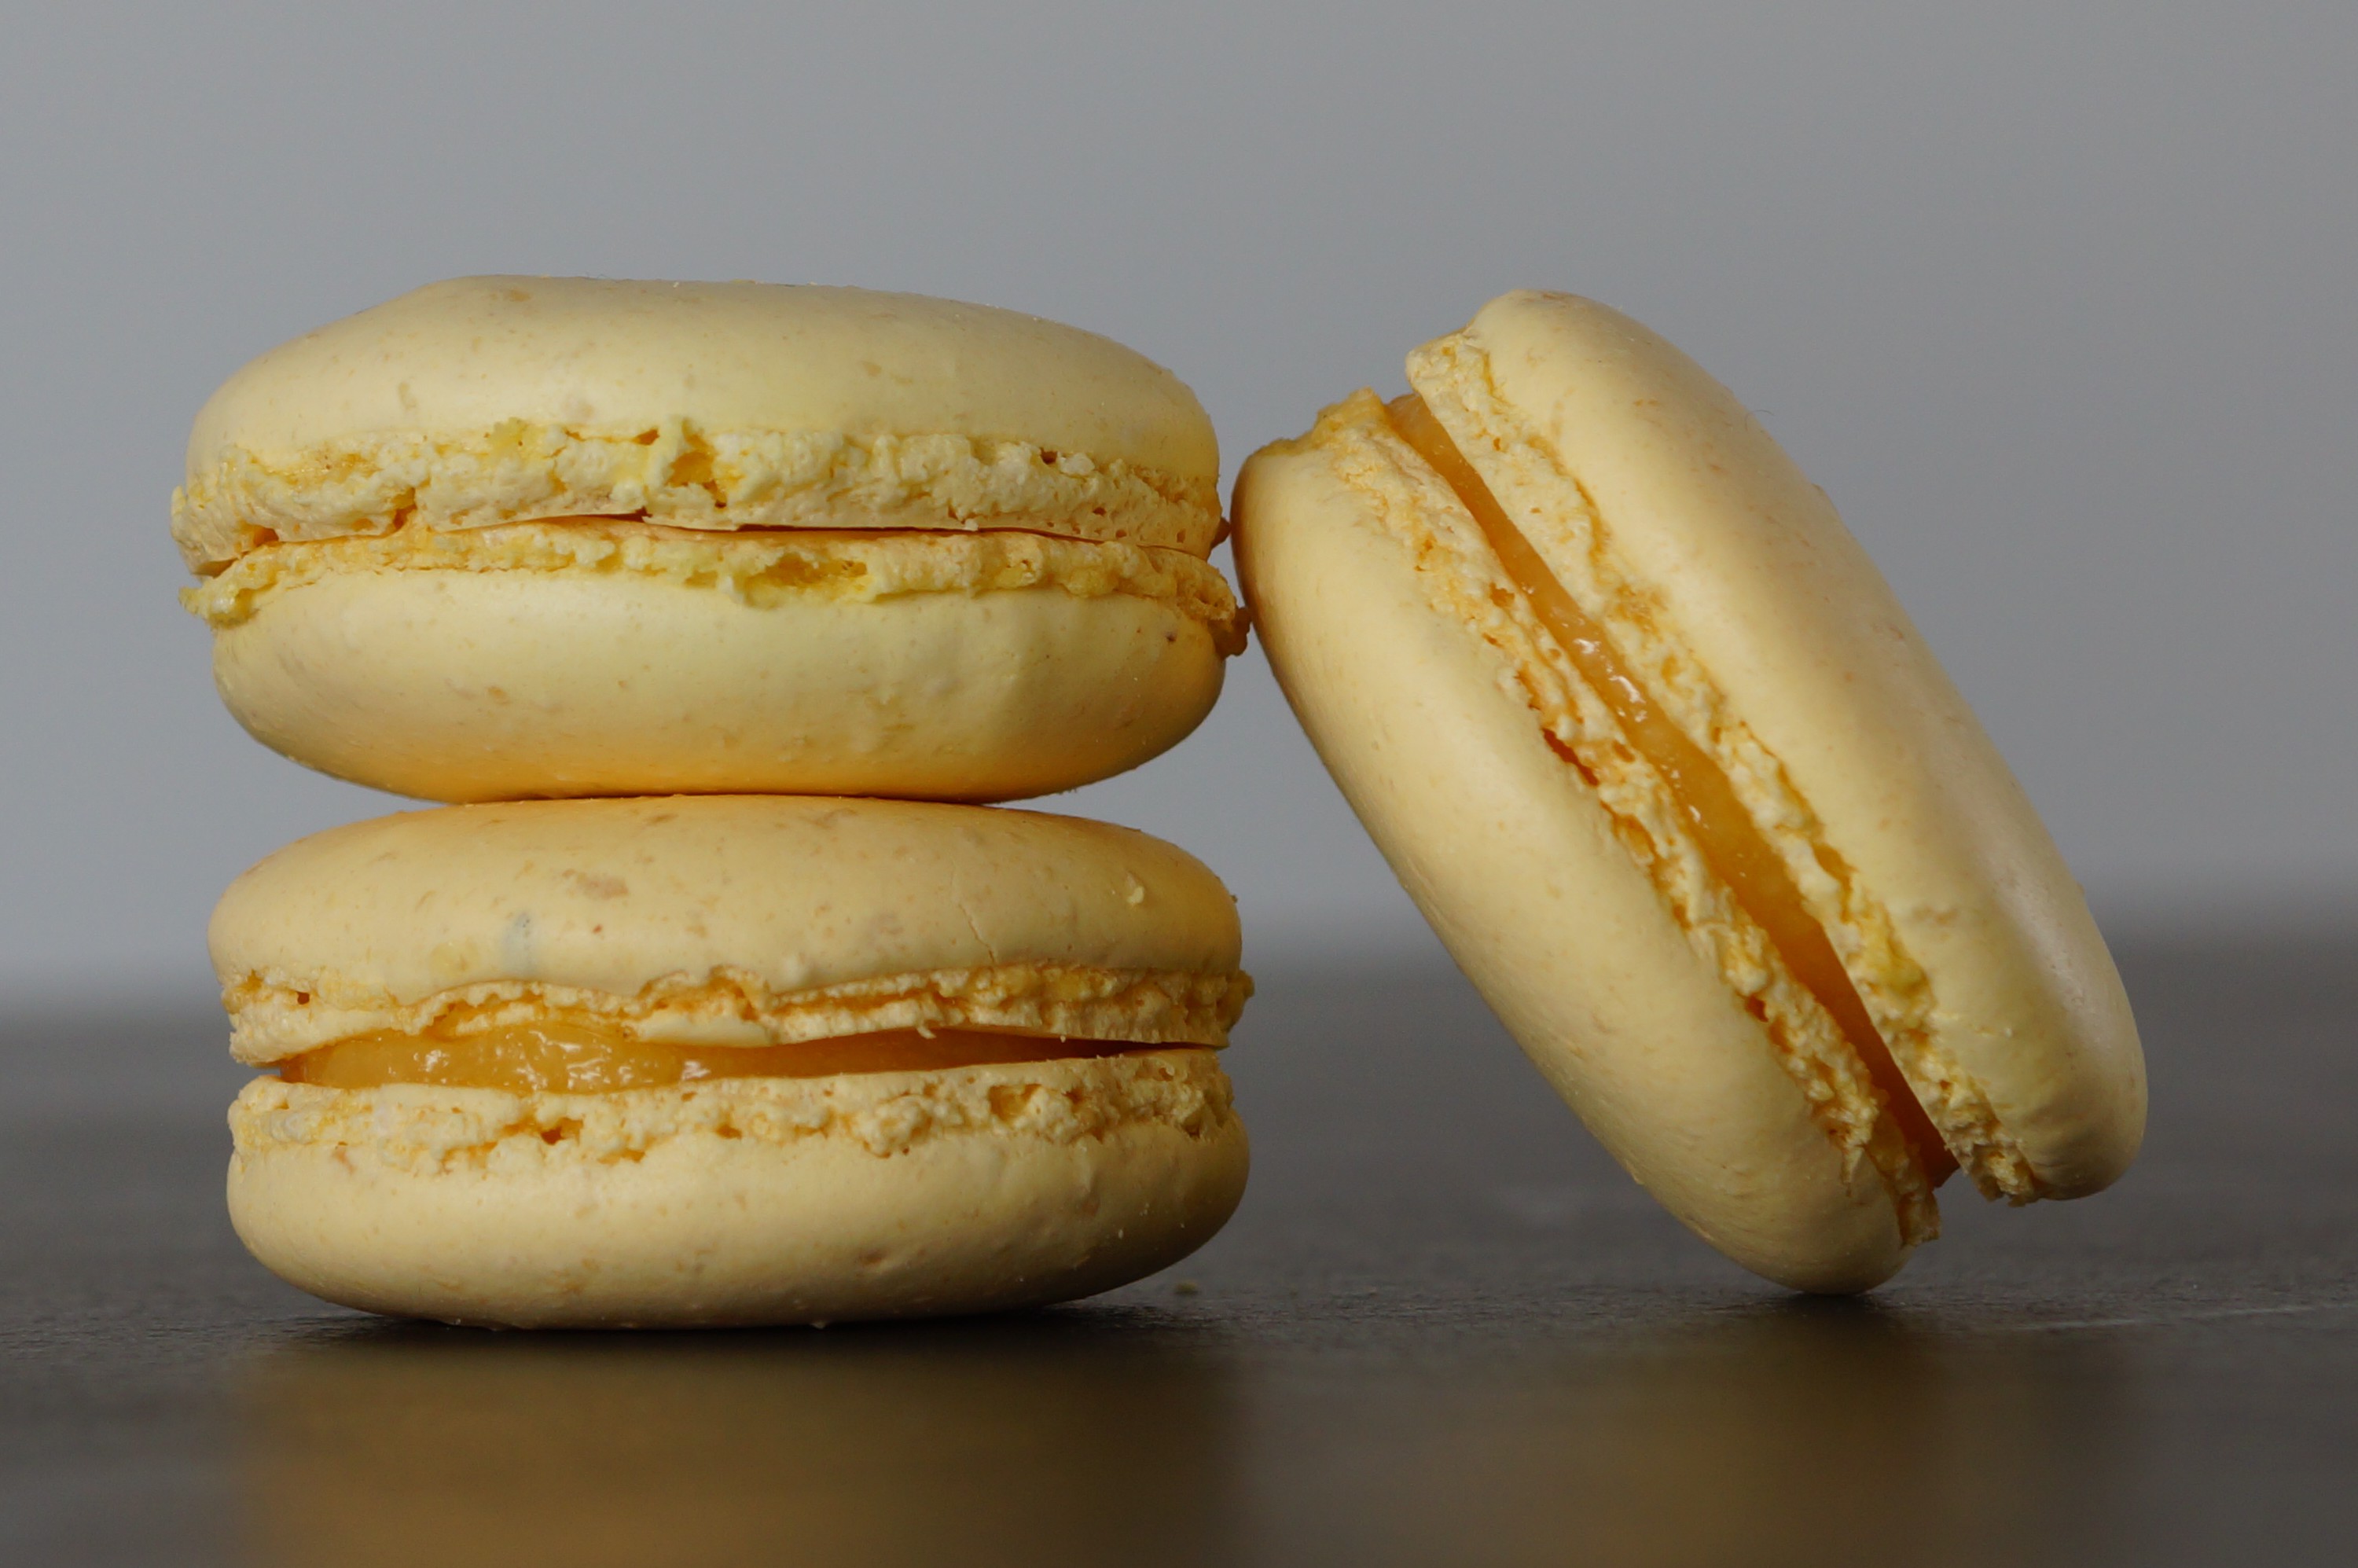
For the Lemon Curd:
- 5 egg yolks
- 2 eggs
- 150 g sugar
- Zest of 2 organic lemons
- 250 g freshly squeezed lemon juice
- 150 g butter (at room temperature)
- Necessary equipment: sauce pan, heatproof bowl that fits above your sauce pan, silicon spatula, thermometer, siev, immersion blender
Mix sugar and lemon zest and let the zest infuse the sugar for at least 30 minutes. Meanwhile you can weigh the other ingredients and do your preperations for the Macaron shells.
Place the heatproof bowl over simmering water, the bowl shouldn’t touch the water. In order to make the curd creamy you should not work in too much air, that’s why using a rubber spatula instead of a whisk is advised. Mix egg yolks, eggs, lemon juice and lemon infused sugar with the spatula in your bowl. Place the butter in another bowl that the siev fits onto. Keep the mixture in your heatproof bowl in motion so it doesn’t burn on the sides. The mixture must reach a temperature of 85°C. Once the temperature is reached, pour the mixture into the siev over the butter-bowl. This helps to get rid of the egg crumbles and results in a smooth and silky curd. Use the immersion blender to work in the butter, hold it upright to prevent too much air and keep blending until the mixture turns whiter. Cover and refrigerate while making the Macaron shells.
For the Macarons:
- 185 g confectioners sugar
- 185 g ground almonds
- 4-5 tsp Gingerbread spice (or a little more if you like a stronger taste) + as much strongly deoiled cocoa powder to make 30 g in total
- 50 g water
- 200 g fine sugar
- 2 x 75 g egg white (equals ca 5 egg whites, but exact weighing is essential)
- red gel food colouring
- Necessary equipment: Food processor, 4 sheets of parchment paper,2 € coin, pencil, siev, candy thermometer, heavy saucepan, spatula, piping bag with round tip
Cut 4 sheets of parchment paper to fit your tray. With pencil and 2€ coin draw circles on your parchment and leave some space in between. You need an even number as each Macaon is a sandwich of 2 shells. The lines should be thick enough that you can see them through the parchment when you turn it upside down on your tray. Preheat the oven to 170° C with fan.
Place ground almonds, confectioners sugar, gingerbread spice and cocoa in the food preocessor and process in pulse mode. The resulting mixture is called Tant-pour-Tant. Sift the mixture into a bowl to prevent crumbs and set aside.
If you do not own a stand mixer, you will need a helping hand for the next steps. Put 75 g egg white in a heatproof bowl that fits in your stand mixer. Place water and sugar in the sauce pan and cook to syrup over medium heat. Use the candy thermometer to check the temperature, it must reach 118°C. As soon as 114° are reached, you can start the stand mixer or your helper to beat the egg whites until stiff at medium speed. As tempting as it may seem don’t put on highspeed as it will result in a heavy foam but we want silky smooth foam. Once the sugar syrup has reached the temperature you can remove it from the heat and let it sit until the bubbles disappear. Slowly pour the syrup into the stiff egg whites while constantly beating at medium speed, once all syrup is in there, you can put the mixer to high speed and beat until the meringue is lukewarm. While the meringue is beaten, you may mix the second 75 g of egg white with the Tant-pour-Tant with a rubber spatula until completly blend. Once the meringue is cooled, you should add a little red food colouring to intensify the brown colour of your Macarons. The meringue should be light rosé before you add a bit of it to your Tant-pour-Tant to blend. Then fold in the rest of the Meringue -et voilá your Macaron mass is ready to go. Transfer to a piping bag with round tip and fill the circles on your parchment paper as exact as possible without causing noses and bumps on the surface of your Macaron. Use your flat hand to slighty beat the bottom of your tray in order to get air bubbles out of the Macarons. Place the tray in the oven and set a timer for 6 minutes. If you look into the oven you can see your Macarons rise and get those typical little feet while the surface gets a lifting. When your timer buzzes it is time to turn the tray by 180° and give them another 6 minutes in the oven. Once they are done directly pull the parchment from the tray and let the shells cool. Please don’t let them remain on the hot tray as they will become too dry. Repeat the procedure until your piping bag is empty and all shells have been baked.
Now it is time to sort your shells and be a matchmaker. Find a sizeable match for each shell and carefully push your thumb on the inside without breaking it. Fill a piping bag with the lemon curd and bring a dot on one half of your Macaron-couple. Sandwich them together and push slighty to spread the curd evenly between the two shells. Store them in a cookie tin in the fridge and separte each layer with parchment paper. Give them a night to develop their full flavour and enjoy with a spicy hot chocolate or a glass of mulled wine. The Macarons can be kept in the fridge for up to 3 days or can be frozen. If you have leftover curd, you can transfer it into a sterilized jar and keep it in the fridge for 1 week. Enjoy as spread or as a sour ice cream topping. If you need the Macarons to last longer, you can also fill them with a dark chocolate ganache instead of curd.
 And aren’t these little gingerbread ma(n)carons adorable?
Christmas Cookies and Procrastination
 I don’t know how many times I told myself to sit down and get writing. But with a lot of stuff going on and so many things to do and a complete lack of structure it never happens. When I set up my Laptop on the Dining Table, opening the blinds to let the sunshine in, the first thing I notice is, that the windows need a clean-up. There are only a few tasks in the house that I hate more than window cleaning and I don’t care about clean windows at any other time of the year but now I feel the urge to clean them RIGHT NOW. I must force myself to ignore the stainy window and sit down to write. If you look up Procrastination in Wikipedia, you may find my photo on there as a bright example of that common species: The Procrastinator. I have been one all my live, even before this fancy word made it into a dictionary.
I am easy to distract, even years of training could only milden my short attention-span. -Oh wait, my coffee mug is empty, I need a refill.- I’ve always needed hard deadlines and pressure to function, for finishing school projects, for picking my study subject or even for the major part of my Master thesis that I wrote in the 2 weeks before hand-in. Germans even have a word for what holds me back: innerer Schweinehund (find the explanation and more hilarious word-by-word-translations of German idioms here).
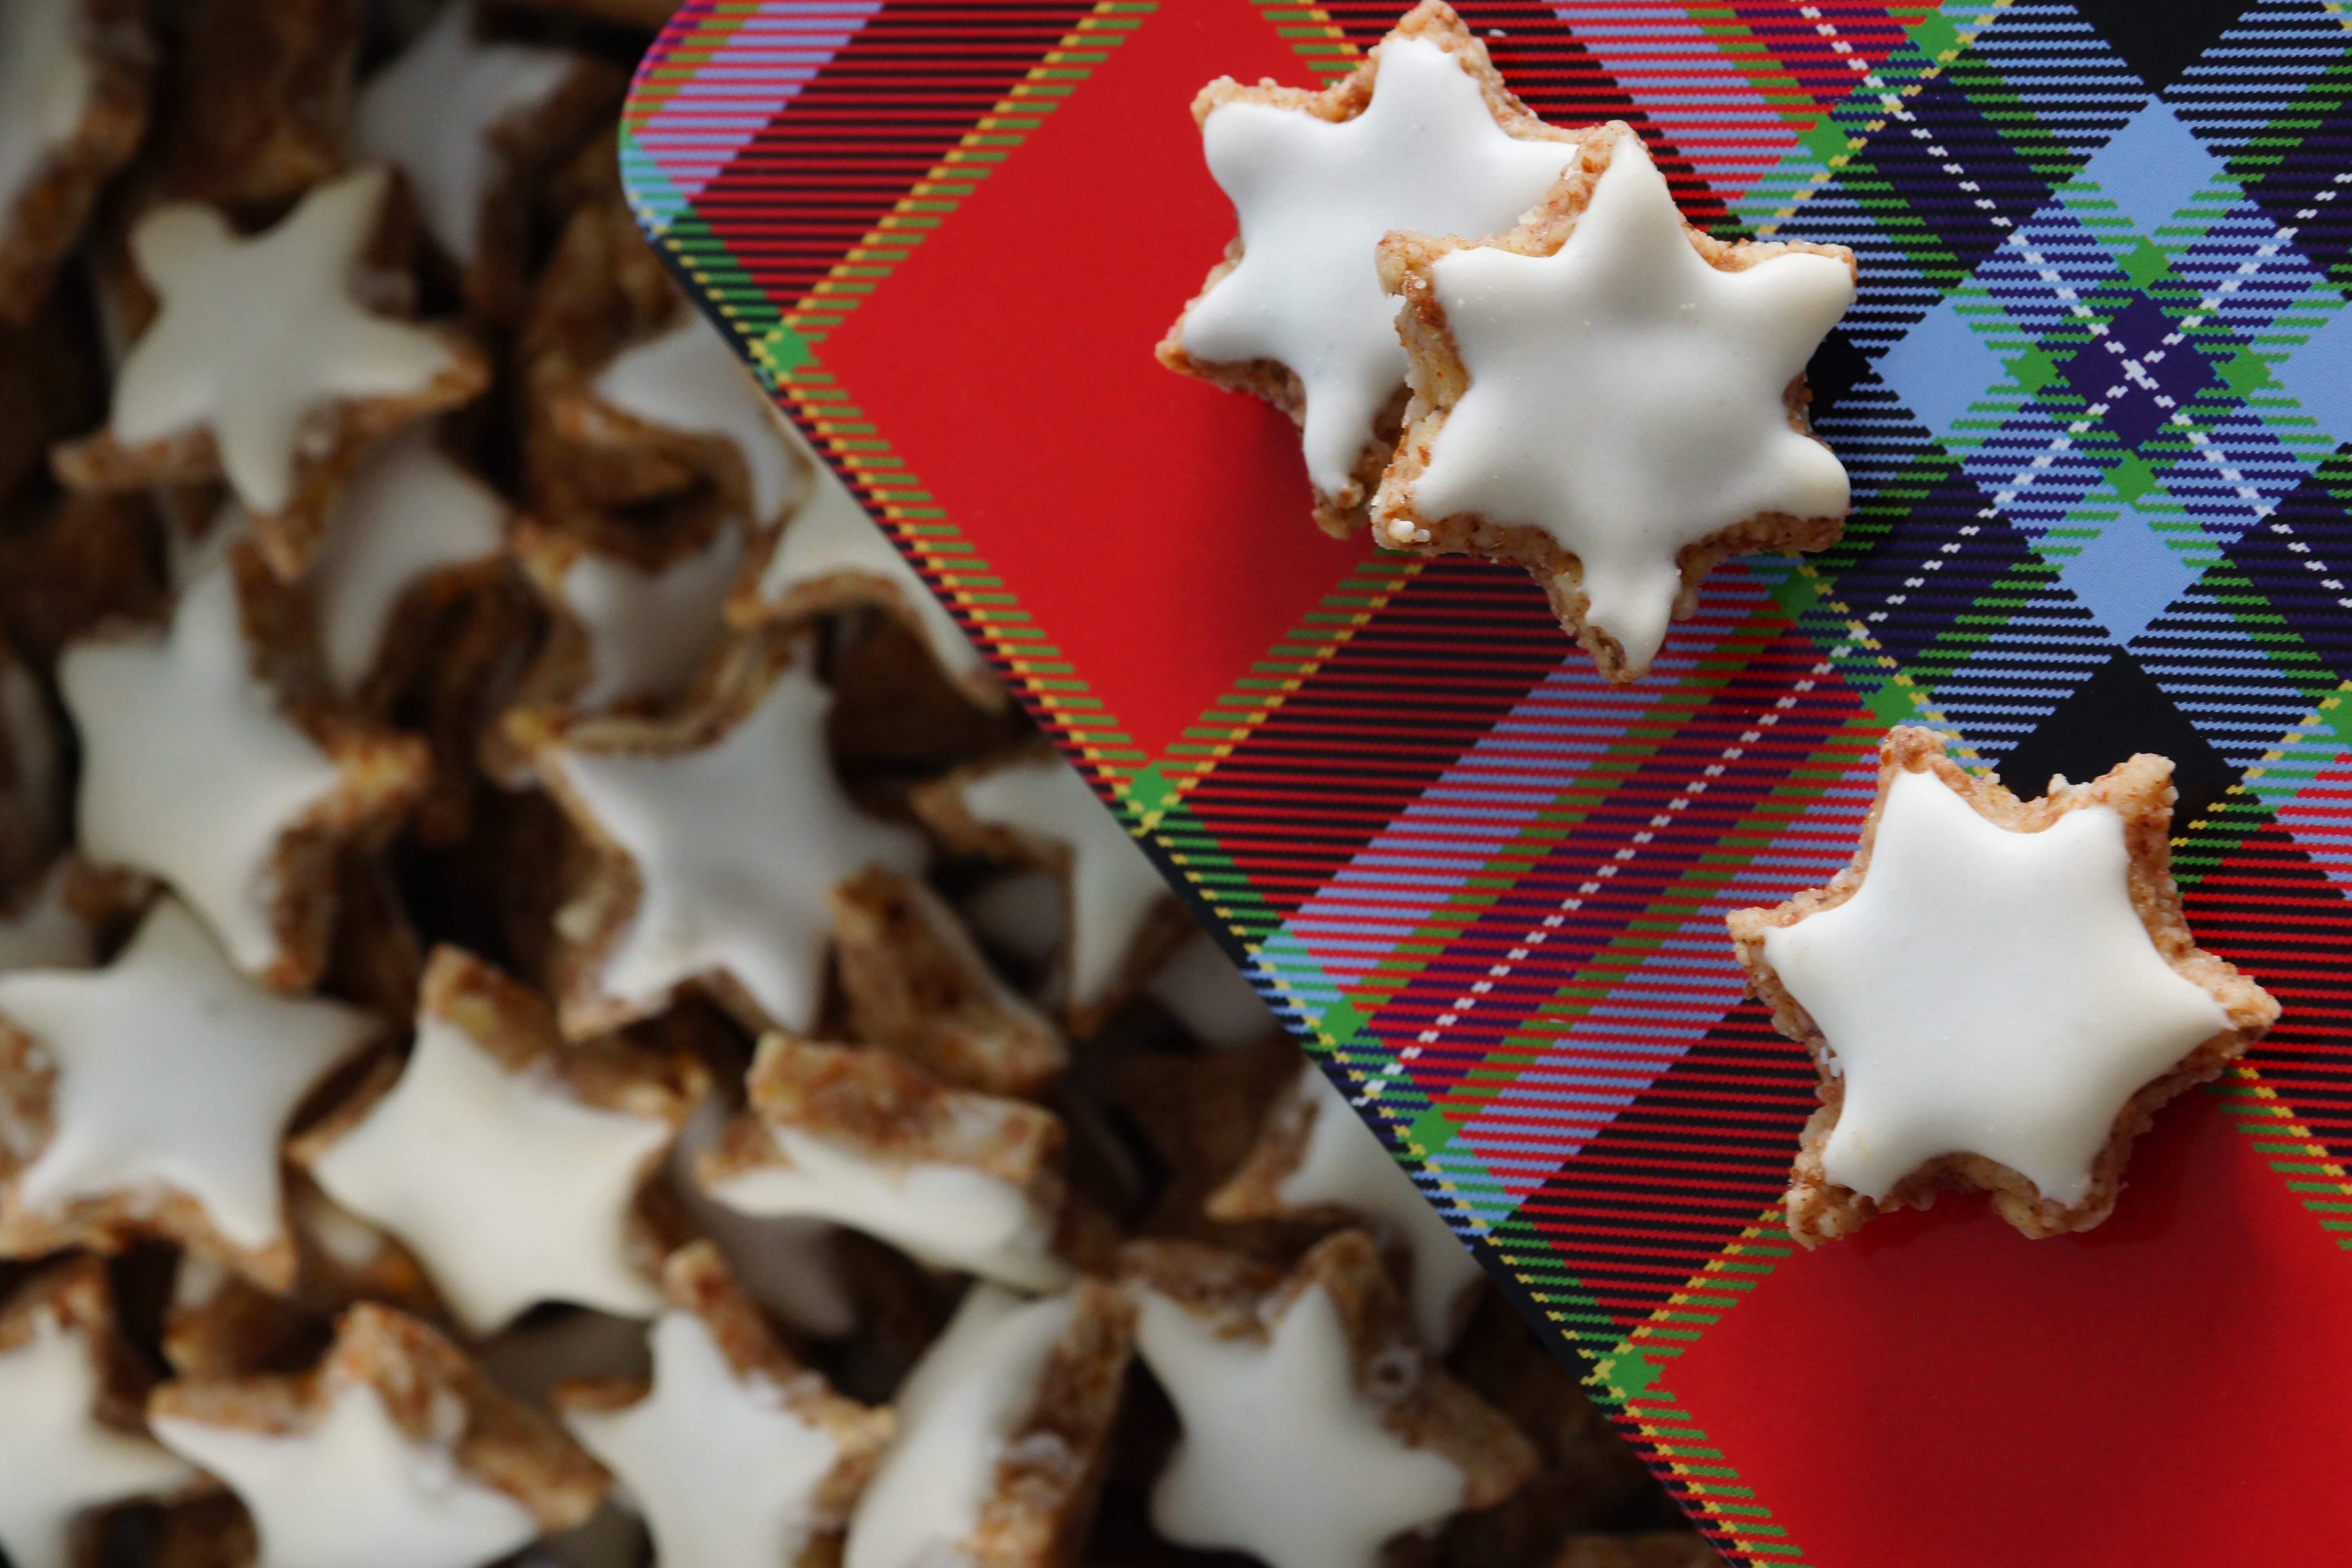
Blogging regularly is an ongoing struggle with myself and I envy those bloggers that have all posts planned, blog more often than once in a week and are so disciplined. In the past few months I have met a few and I wish I was more like them. I have to remind myself from time to time in order to get things done. I have to train to have patience with things and with myself and cinnamon stars are the perfect excercise for this. Cinnamon stars are delicious and not that hard to make but the dough is sticky, needs to cool overnight, the icing needs to be piped on every single star if you want them to look good and to top all this, they need to dry overnight before baking. And that’s why you need patience (and space…).
For the cookies:
- 400 g ground almonds (with skin) + 100 g as backup
- 375 g confectioners sugar
- 15 g ceylon cinnamon
- 4 egg whites (125 g total)
For the icing:
- 500 g confectioners sugar
- 2 egg whites
Mix all ingredients for the cookies together, if it is too sticky you can add some more almonds but don’t overdo. If you add too much almond they will turn out hard as stones, my Mum and Sister have been down this road… Split the dough in 4 parts and roll each part between thick cling film or freezer bags that you cut open on 2 sides with 0.5 cm thickness. As the dough is rather sticky, it is better to process it in small batches.
Let the dough cool in the fridge for some hours, better overnight. After rest-time take the first batch off the fridge, loosen the cling film/freezer bag on both sides of the dough and remove on one side completely. Then cut out stars with a starshaped cookie cutter. A wooden toothpick, a teaspoon and a small bowl of water are helpful tools to get the stars out of the cutter from time to time too. Dip your cutter into the water from time to time and remove sticky stars with the back of the teaspoon or the toothpick. Transfer your stars onto baking trays lined with parchment paper. You can roll up the rest of the dough in 0.5 cm thickness and put it back in the fridge while you proceed with the next batch and so on until you used up the dough.
If you haven’t lost patince until now, you are on a good path and have quallified for the next level: Icing. Beat egg whites and sifted confectioners sugar until the icing is smooth and thick. You can now either brush the icing onto your stars or use a piping bag with a small round nozzle. I used to brush mine but it always ended in one great big mess and the stars didn’t look as good as they look piped. Now look at the sheer masses of cookies lying in front of you, tell yourself that they are worth the work and believe me, they are going to taste even better, when you only keep going now. Brush/Pipe the icing on the stars, try to be as accurate as you can with each and every cookie. This is were the patience needs to kick in, if not, remember to listen to the guys of Take That: “Have a little patieeeence”.
Once you iced them all, you can be proud of yourself and pat yourself on the shoulder -yeah another German idiom- because YOU MADE IT. Now you leave these suckers to dry until the icing is completely firm for at least 2 hours, better over night. It is time to pour yourself a drink of whatever you like and be proud of yourself because you tackled the next level. The rest is going to be a walk in the park, trust me.
Preheat the oven to 130°C with fan and bake for 12-15 minutes. Better check on them after 10 minutes and turn the tray if necessary as the icing should remain white. Once they are baked, let them cool on a whire rack. Keep them in a cookie tin for up to 4 weeks.
You can pimp these cookies by adding the zest of 1 organic orange or other spices to the dough for an extra christmassy flavour.
Basic Macarons with Italian Meringue
 Have you ever tried French Macarons? I got to eat my first Macaron 3 years back when I was brought one from a local Patisserie in my Hometown. I had seen them before but never tried. It only took one small bite to make me fall for them. The shells are mainly made of Meringue and Almonds and can be filled with all sorts of buttercream, fruit, chocolate ganache or a combination of those. I have however tried several times to make them myself but always failed due to various reasons. After I got Christophe Felders Patisserie book for my birthday I was assured that I would have to try one more time or leave it for ever. I decided for the former and gave it one last shot: They were absolutely amazing!
My oven does not bake evenly but I figured where the macarons get too crisp or start to tear after a few trays. But even when they might not look perfect, they taste like heaven, soft and light as air. They also always get those characteristic feet and a smooth surface, just as they should be. As I mentioned before, I have tried various recipes and different techniques, this one might be one of the complicated ones but it works for me every single time. Continue reading
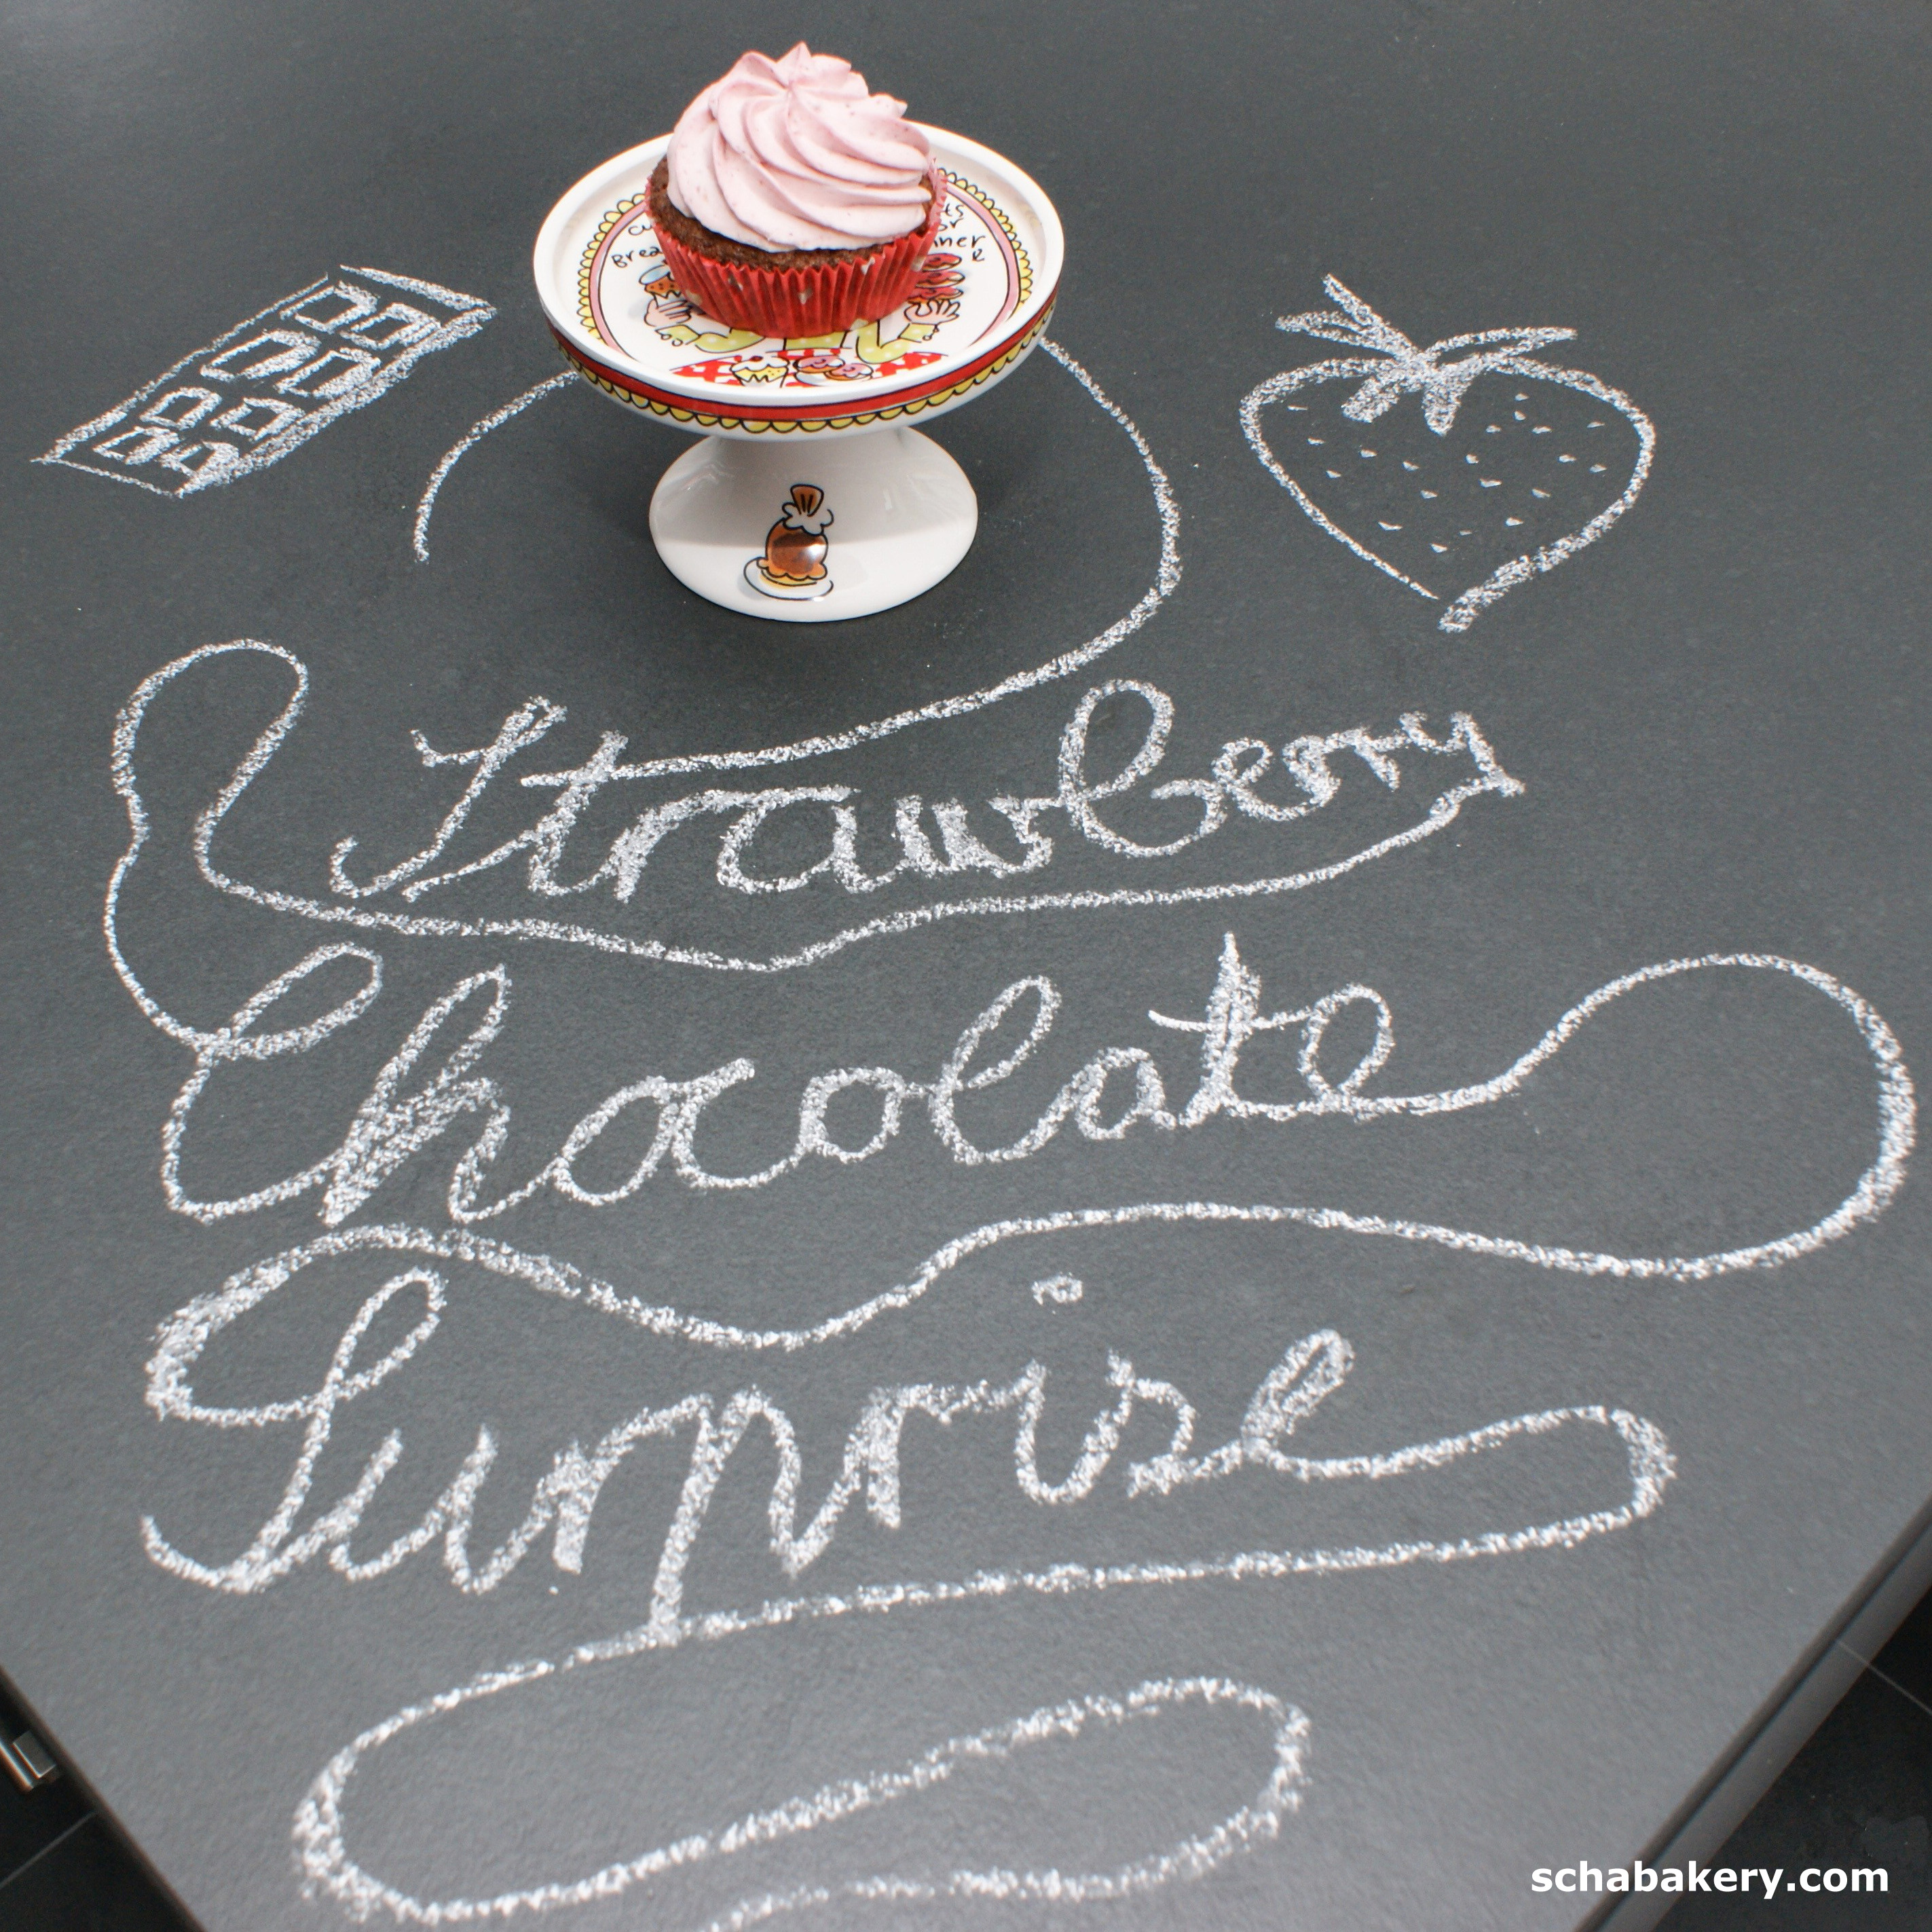
Strawberry Chocolate Surprise Cupcakes
 This weather is seriously killing me, I was not done with summer yet. However you cannot change the seasons or the weather, but you can change your state of mind. With all the power of my mind I try to hold on to the summer feelings with these wonderful Chocolate Strawberry Surprise Cupcakes. I did them a while back with fresh strawberries from the farmer’s market but haven’t managed to put down the recipe yet
 because I’ve lost the post it where I noted the ingredients. The cupcake is my favourite chocolate cupcake recipe, that you can use as a base for almost any topping. I added a little strawberry surprise inside the center of the cupcakes before adding the frosting. All eaters were totally delighted, but you better try yourself! Continue reading
German-style Apple Cider Cake
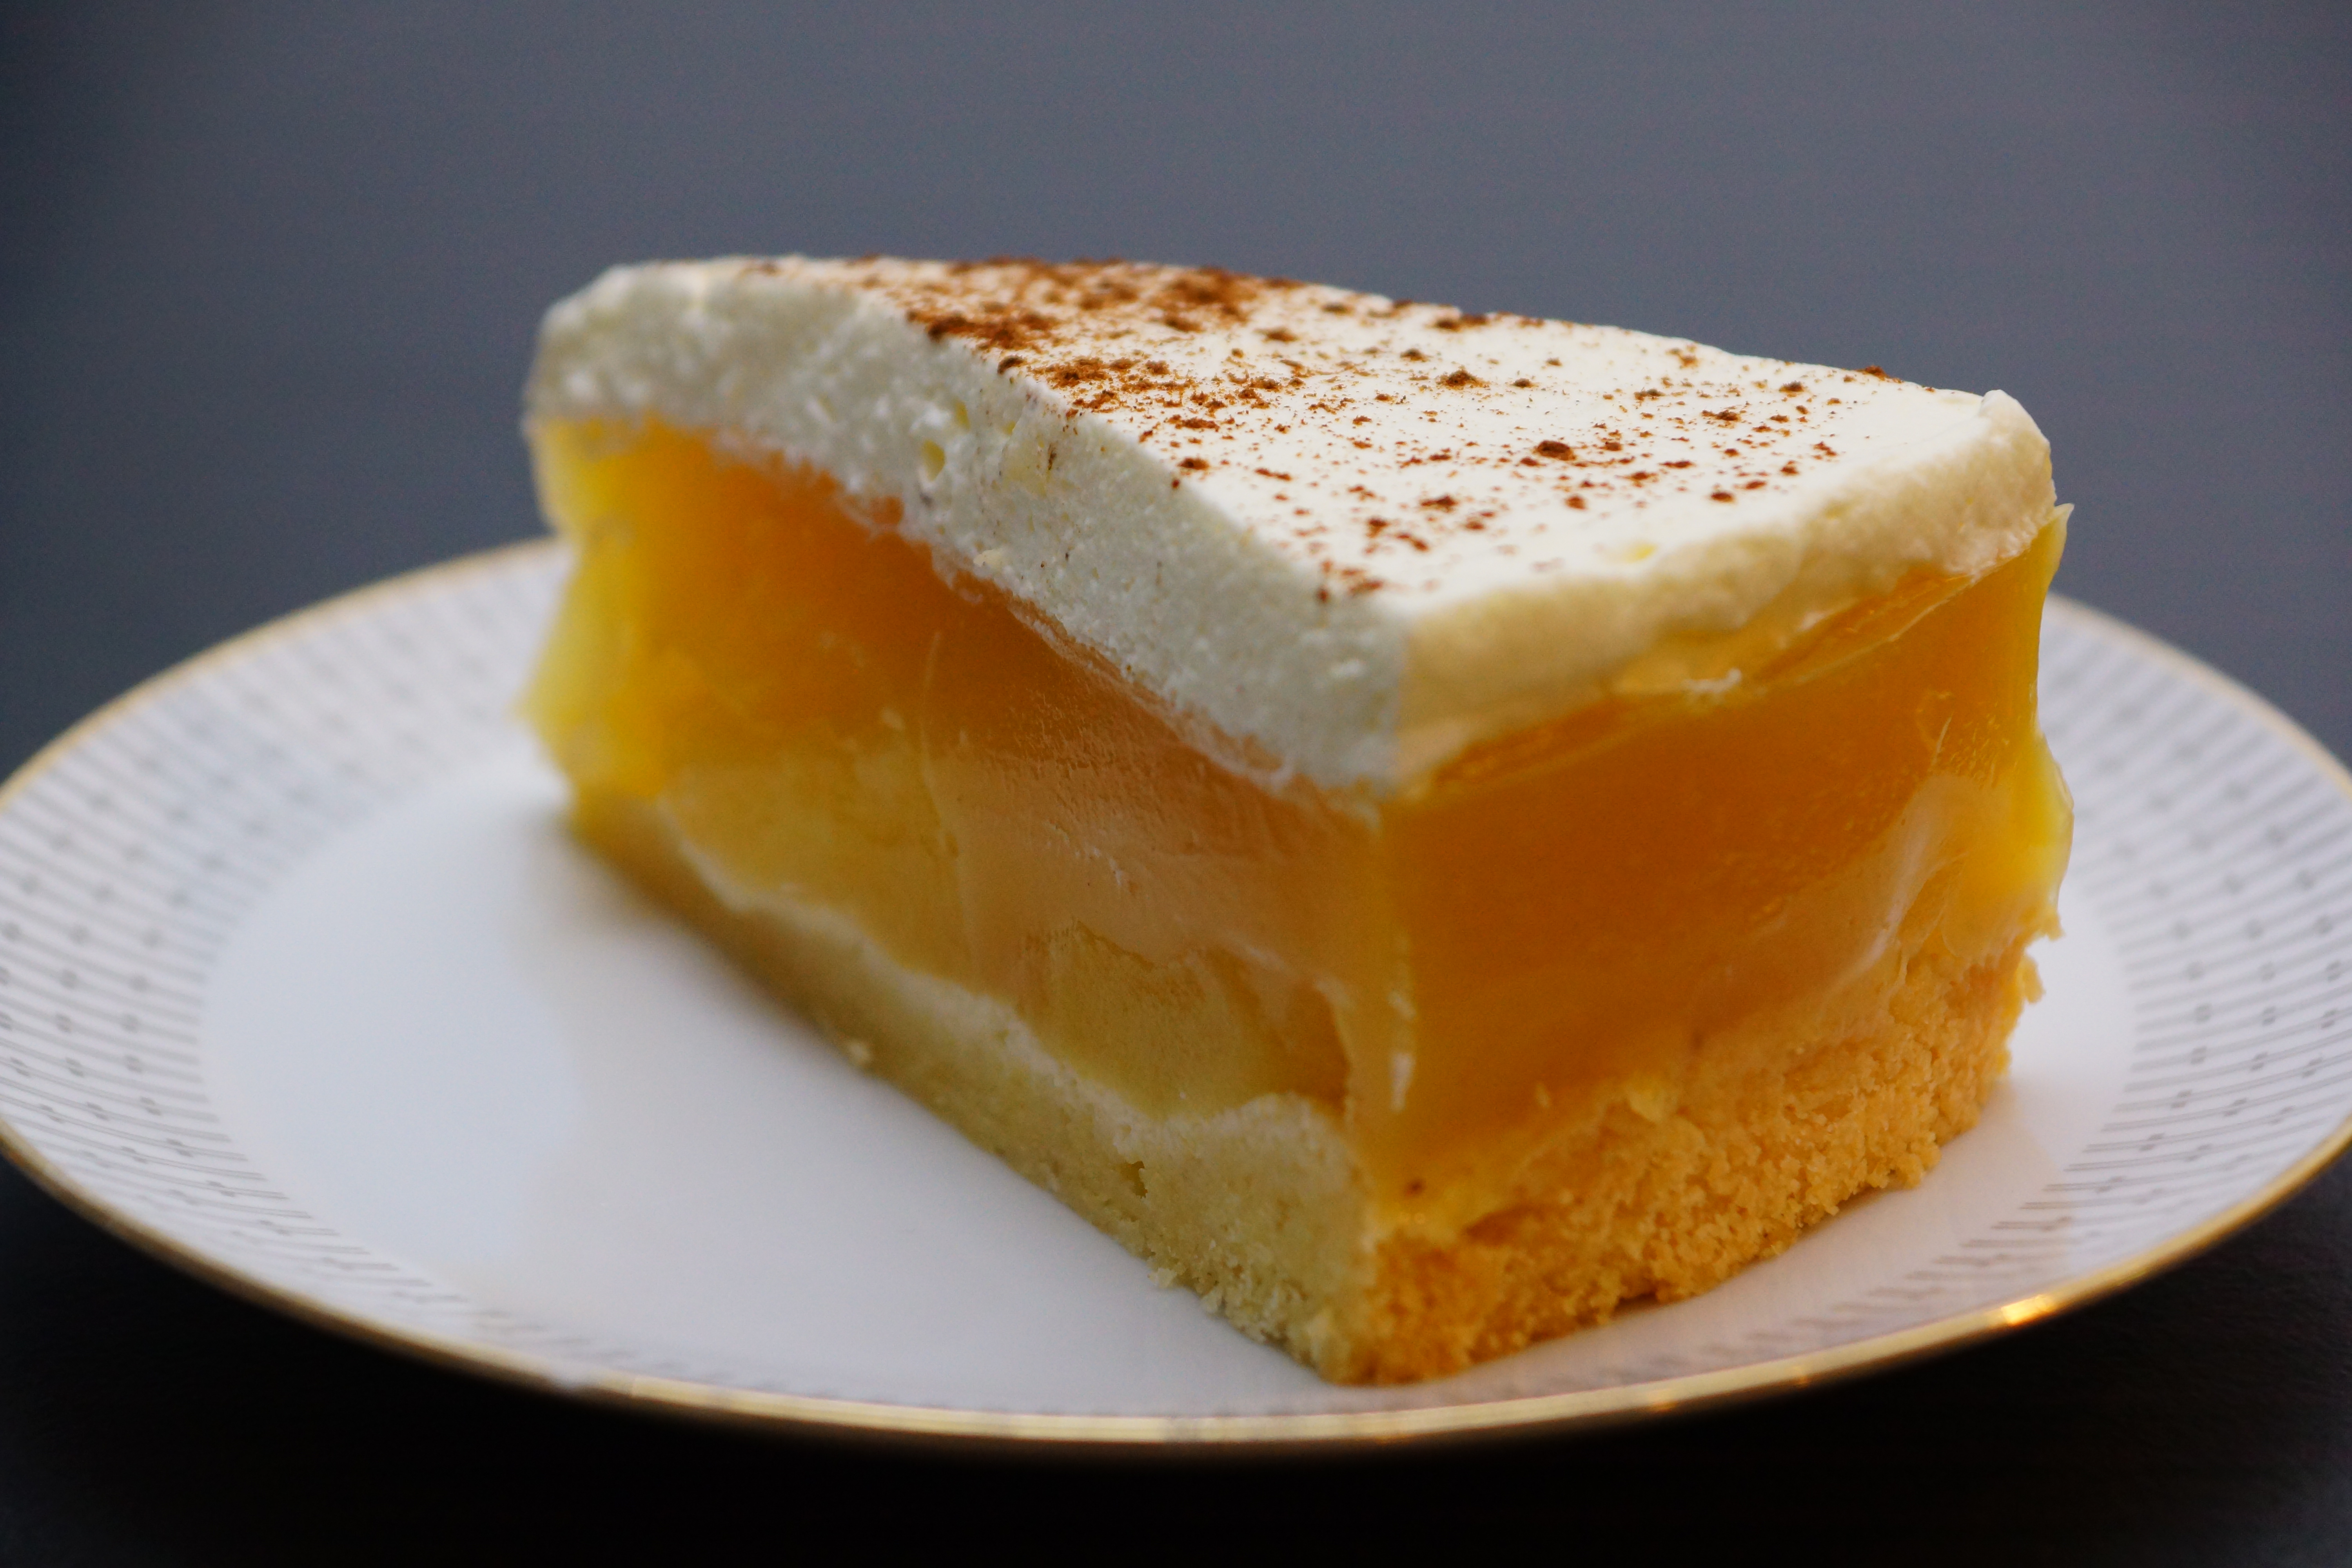 Those of you who follow my instagram know already that I paid my annual visit to the Apfelweinfestival (aka Cider Festival) in Frankfurt some weeks ago. I love applewine and thus the festival. It takes place in the center of Frankfurt city and always comes with the most hilarious stage acts that you can imagine and lots of different cider makers from around Frankfurt. We went during the day but that did not keep us from trying out various variations of cider and enjoying the stage highlights. On my way home, I was craving my Mum’s Applewine Cake so much that I had to make some. When I fiddled out the recipe lightning struck me. Funny how a hyphen can shatter your entire world. I always thought it was applewine (as in cider) and not apple-wine (just apples and real wine) cake for all my life. No I know better and transformed it into Apple Cider Cake.
Sugar cookies – an edible Wedding Favour
 Wow! I can’t believe one year has already passed. This Sunday is our first Wedding anniversary and the date coming closer filled me with mixed emotions. On one hand it makes me really happy because we spent a fantastic day with friends & family and had a wonderful ceremony & party. On the other hand it makes me sad, because my grandpa couldn’t be with us and died a few weeks after our Wedding. But I’ll stick to those happy memories for now, because everything else would make me burst in tears. Continue reading
Salted Caramel Brownies
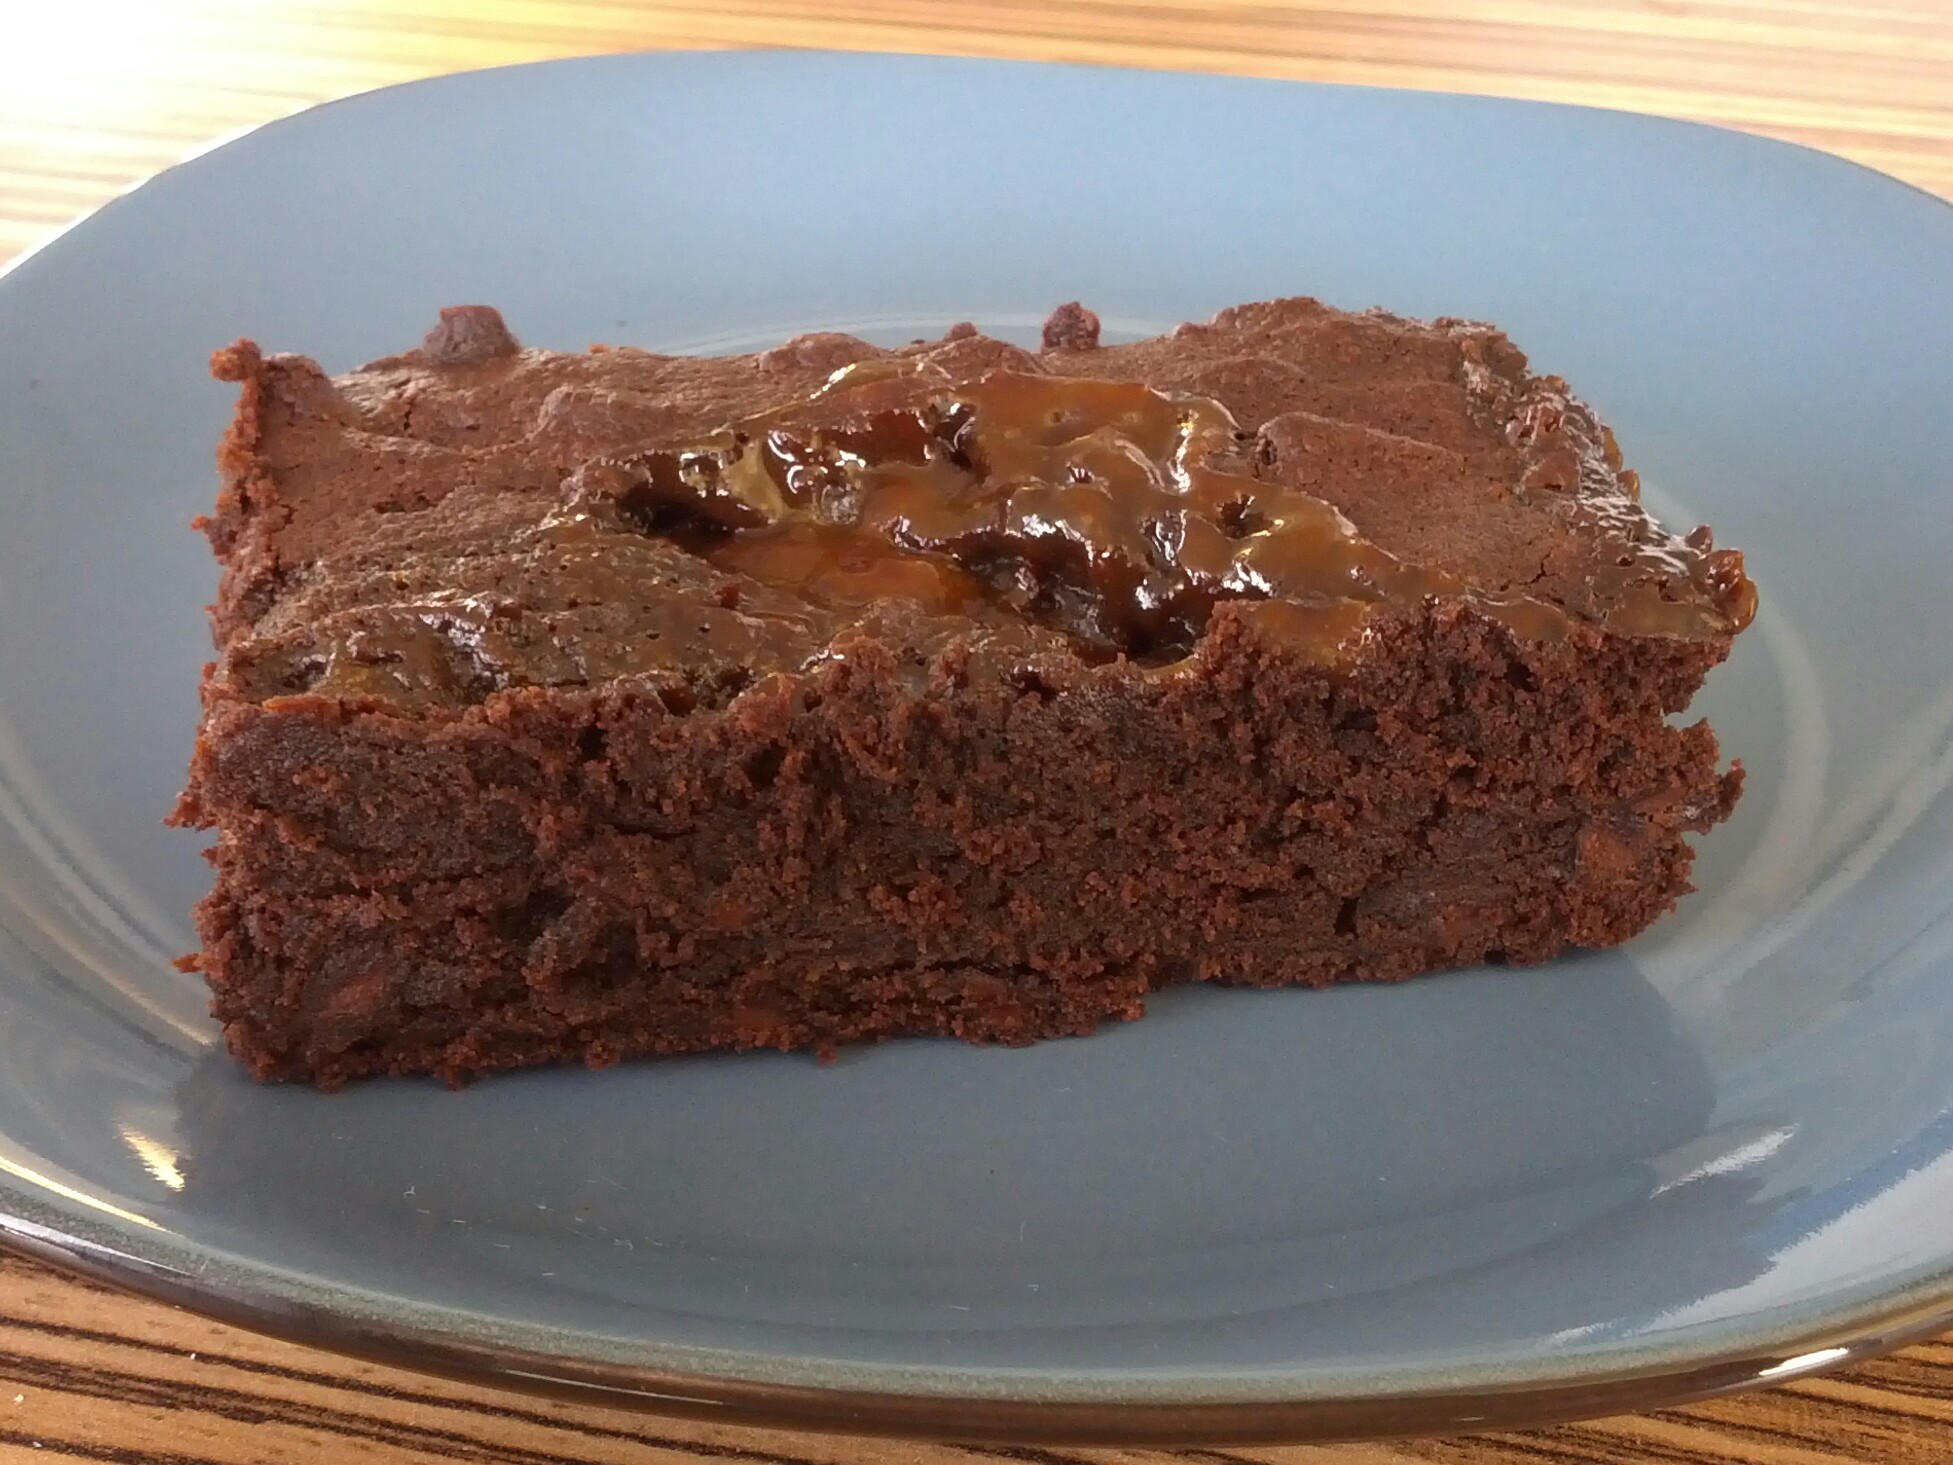 I love chocolate AND salted caramel. I love the combination of salty and sweet, as I’ve written about this in my Beer Batter Maple Bacon Cupcake Post before, I won’t go into more detail here. Chocolate and salted caramel is a fancy and also very popular combination yet hard to top. I remembered the delicious cookies with salt and caramel and thought to myself, that the same flavour could fit into one tray of brownies. My first impulse was to just make brownies and top it with salted caramel sauce. But that sounded too lame, so I searched for some directions online and that gave me another idea of how to realise it. These brownies are very chocolatey, not too sweet and the salted caramel completes this treat. Sorry for the basic photo, I had to take the phone to capture this beauty before the office mates ate them all up. Continue reading
Zebra cake
Recently a friend of mine asked me if I could make some cake and cookies for her sons birthday. As it was a Knight-themed party and included a treasure hunt on the woods, it had to be sugar cookue coins and a castle-cake, easy to transport, suitable for kids and outdoors on a hot day. I started to look for inspirations and found a lot of cool looking stuff, but most of these cakes were neither transportable not suitable for kids. Plus I had to chose something I’d be able to do with a sore leg. After a lot of thinking it came down to the simplest solution: A square cake cut out as a 2D-castle. Zebra cake with sugar icing should do the trick.
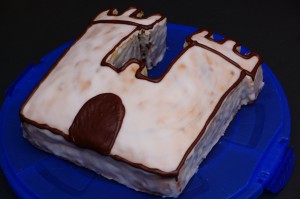 This cake is rather simple to make but has a stunning zebra-stripe effect, that makes sassy and unique. It tastes so good, is very moist but solid enough to cut it into shape. I’ve been doing a lot of those zebra cakes in my baking life, it was actually the first cake that I ever made all on my own. It is my mothers swiss-army-knife cake, suitable for every shape or occasion you can imagine, from Easter lambs over giant car-shaped birthday cakes to cake reindeers. I associate darn good memories with this cake though I haven’t been making it very often since I moved out of my Mums house. It’s the star at every Kiddie Party and even amazes grown ups. But shhhhh don’t tell them it is this easy! Continue reading
Lemon Bundt Cake
Confessions of a baking addict: I am am obsessed with bakeware. I have tons of baking tins in all kinds of shapes but keep using only a fraction of them. But how many do you need? Many books suggest to aquire a loaf tin, a 8″ round one, a 9″ square pan and a bakingt tray. In addition some also suggest a 8″ tarte tin with removable base.
I own all of them except for the 8″ round, along with a few muffin tins, a round and a square 26 cm spring form, various bigger and smaller tarte tins, tartelette circles, Spongebobs, 3-tier-cakes, eastereggs, Santa Clauses and a lot of other stuff. Not to mention the million cookie cutters I bought over time and all the other equipment that keeps piling up in my basement. And still I catch myself urging to buy those 8″ sandwich tins or other things when browsing TK Maxx or the local kitchen appliance store. I don’t allow myself to buy anything new unless I kick out something else, but apparently I need to declutter my utensils in the near future… Continue reading