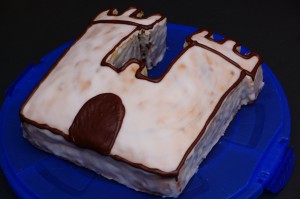
Recently a friend of mine asked me if I could make some cake and cookies for her sons birthday. As it was a Knight-themed party and included a treasure hunt on the woods, it had to be sugar cookue coins and a castle-cake, easy to transport, suitable for kids and outdoors on a hot day. I started to look for inspirations and found a lot of cool looking stuff, but most of these cakes were neither transportable not suitable for kids. Plus I had to chose something I’d be able to do with a sore leg. After a lot of thinking it came down to the simplest solution: A square cake cut out as a 2D-castle. Zebra cake with sugar icing should do the trick.
 This cake is rather simple to make but has a stunning zebra-stripe effect, that makes sassy and unique. It tastes so good, is very moist but solid enough to cut it into shape. I’ve been doing a lot of those zebra cakes in my baking life, it was actually the first cake that I ever made all on my own. It is my mothers swiss-army-knife cake, suitable for every shape or occasion you can imagine, from Easter lambs over giant car-shaped birthday cakes to cake reindeers. I associate darn good memories with this cake though I haven’t been making it very often since I moved out of my Mums house. It’s the star at every Kiddie Party and even amazes grown ups. But shhhhh don’t tell them it is this easy!For the cake:
- 5 eggs, separated
- 1 tbsp vanilla sugar
- 250 g sugar
- 125 ml water
- 250 ml neutral vegetable oil
- 1 tsp vanilla extract
- 375 g flour, sifted
- pinch of salt
- 1 pack baking powder
- 2 tbsp cocoa powder
First of all wheigh your mixing bowl, you will have to separate the dough later and knowing how heavy your bowl is makes it easier. Line your tin with parchment paper, I used a 26 cm square spring tin for my castle. Preheat the oven to 160° C with fan. Separate the eggs, make sure you put the yolks into the bowl that you weighed before. Beat the egg whites with the vanilla sugar at medium speed until they are stiff. In the other bowl beat the egg yolks untill fluffy and gradually add the sugar. Keep beating, you need to fluff it up as much as possible. Pour in water, oil and vanilla extract, stir to combine, don’t kill the fluff. Sift in the flour and baking powder in 2 parts and mix. Carefully fold in the stiff egg whites to complete the cake base. Now you need to separate the dough in 2 even parts. I do this by weighing, that is why you need to know how heavy your bowl is. Sift the cacoa into one bowl and fold it in. Now it is time to start with the magic.
I place the cake tin between the two bowls. Now it’s time to spoon in some 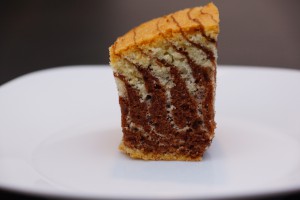 zebra stripes: Start with 2 Tablespoons of white dough in the center of your tin. Next spoon 2 Tablespoons of brown dough into the middle on your white doughspot. Top again with 2 tablespoons of white dough, then again brown and so on until all dough is used up. Make sure you hit the center of your pan to create even zebra stripes. Bake for 50-60 minutes dependent on the size of your tin until a skewer inserted comes out clean. You can play around with the colours and different patterns, why not make it a giraffe next time?
For the icing:
- 250 g icing sugar
- 4 tbsp water
- 2 tbsp lemon juice
Sift the icing sugar into a bowl, mix water and lemon juice in another bowl. Add the water juice mixture tablespoonwise until the icing has the right consitency. For this cake it had to be thicker and not to runny. I left over some of the icing and added a little cocoa powder to draw doors and highlights. My friend was a little upset, because the kids liked it so much, they didn’t leave a crumb for the grown ups.
The cut outs I crumbled into another bowl, mixed with half a package of cream cheese, 1 tablespoon of butter and 2 tablespoons of icing sugar. I formed cake pops, covered them with chocolate and colourful sprinkles. I thought it’d be a nice add on for the kids. Too bad the kids didn’t get to eat any, because Daddy liked them so much, he didn’t share.